Article directory
- Install Hugo on your local computer, select a theme, and create a Hugo project
- Export the content from the WordPress backend, and then return to the local computer to convert it into Hugo’s Markdown format.
- Push the organized content and Hugo blog to Github
- Connect the Github repository on Vercel and set the build command and
- Configure a dedicated domain
1. Install hugo theme and start testing
Binary Install
cd ~
wget https://github.com/gohugoio/hugo/releases/download/v0.164.0/hugo_0.164.0_linux-amd64.tar.gz #download

tar -xzf hugo_0.164.0_linux-amd64.tar.gz #unzip
sudo mv hugo /usr/local/bin/hugo #move to bin
hugo version #check hugo version
New Site and Add Theme
cd ~
hugo new site myblog #new site by hugo
cd myblog
git init # git init
git submodule add --depth=1 https://github.com/adityatelange/hugo-PaperMod.git themes/PaperMod #Add PaperMod theme
Now, you can add it in hugo.toml 文件中将主題 PaperMod`.
hugo.toml Example:
baseURL = "https://{yourdomian}/"
languageCode = "en-us"
title = "Site title"
theme = "PaperMod" #theme name

[params]
  defaultTheme = "auto"
  ShowReadingTime = true
  ShowShareButtons = false
  ShowPostNavLinks = true
  ShowBreadCrumbs = true

[markup]
  [markup.goldmark]
    [markup.goldmark.renderer]
      unsafe = true
Then you can execute hugo server -D to start hugo and check whether it can start normally.
Tips
#bind only
hugo server -D --bind 0.0.0.0 --port 8080


# bind and baseURL
hugo server -D --bind 0.0.0.0 --port 8080 --baseURL http://123.45.67.89:8080/
2. Use wordpress-export-to-markdown to export the WordPress content file and convert it to Markdown format
Tips
xml format file. Then confirm the installation of node and npm. Because they are converted to markdown, they are needed.Steps to export xml: WordPress 後台> 工具> 匯出程式
Convert content using wordpress-export-to-markdown
Enter the project root directory and note the path of the xml file
#確認npm, node >20.12.2版本
node --version


npx wordpress-export-to-markdown #等待下載套件

#會提示你輸入xml文件的路徑
#剩下的全部默認就可以
#轉換完成會有匯總顯示

ls output #查看輸出內容

cp -r output/posts/* content/posts/ #複製轉換好的內容到posts 目錄

ls content/posts/ #驗證搬移結果

ls content/posts/ | wc -l #查看總數
During this time you can
- Adjust theme style
- Modify
hugo.tomlconfiguration
3. Push local Hugo to Github
You need to create a new repository on github first
Create
.gitignorein the local hugo root directory
public/
resources/
.hugo_build.lock
node_modules/
output/- Add all files and commit
git status #查看git 狀態
git add -A
git commit -m "Initial commit: Hugo blog with wordpress migrated content"- Connect to the remote repository and push
git remote add origin https://github.com/{yourname}/{your_repo}.git
git branch -M main git push -u origin main
Tips
merge
git pull origin main --allow-unrelated-histories --no-rebase #合併
git branch -M main git push -u origin main #再push
Then you can see the content on your github.
4. Add a new Project in Vercel and set the build command
Find the ** “Import Git Repository” ** block at the top of the page or in the sidebar (usually right above or next to the address bar), first confirm whether your Vercel account is connected to GitHub
If you haven’t connected yet, you will see a button similar to ** “Continue with GitHub” ** or ** “Add GitHub Account” **. Clicking it will jump to the GitHub page, asking you to install and authorize Vercel. GitHub App
The authorization screen will ask you which repos you want to access for Vercel:
- All repositories(所有 repo)
- Only select repositories(只選特定的)
建議選 Only select repositories,然後勾選 你新建的repo,這樣比較安全,不會把你其他 repo 也一併授權出去
After the authorization is completed, return to Vercel and you should be able to directly import it in the Import list.SeeFor the repo card you selected, click next to itImportbutton on it.
Build and Output Settings
Build Command: Click the switch on the right to open it and enter:
hugo --gc --minifyOutput Directory: Click the switch on the right to open it and enter:
publicInstall Command: Leave it blank and turn off the switch (the Hugo project does not require installation steps like npm install, unless you use Node-related build tools, which are currently not available)
Environment Variables
First add the Hugo version settings mentioned before:
Key: HUGO_VERSION
Value: 0.164.0
Google Analytics 4 Tracking Code
Add a new Environment Variables
Key: HUGO_SERVICES_GOOGLEANALYTICS_ID
Value: G-XXXXXXXXXX
5. Configure a dedicated domain
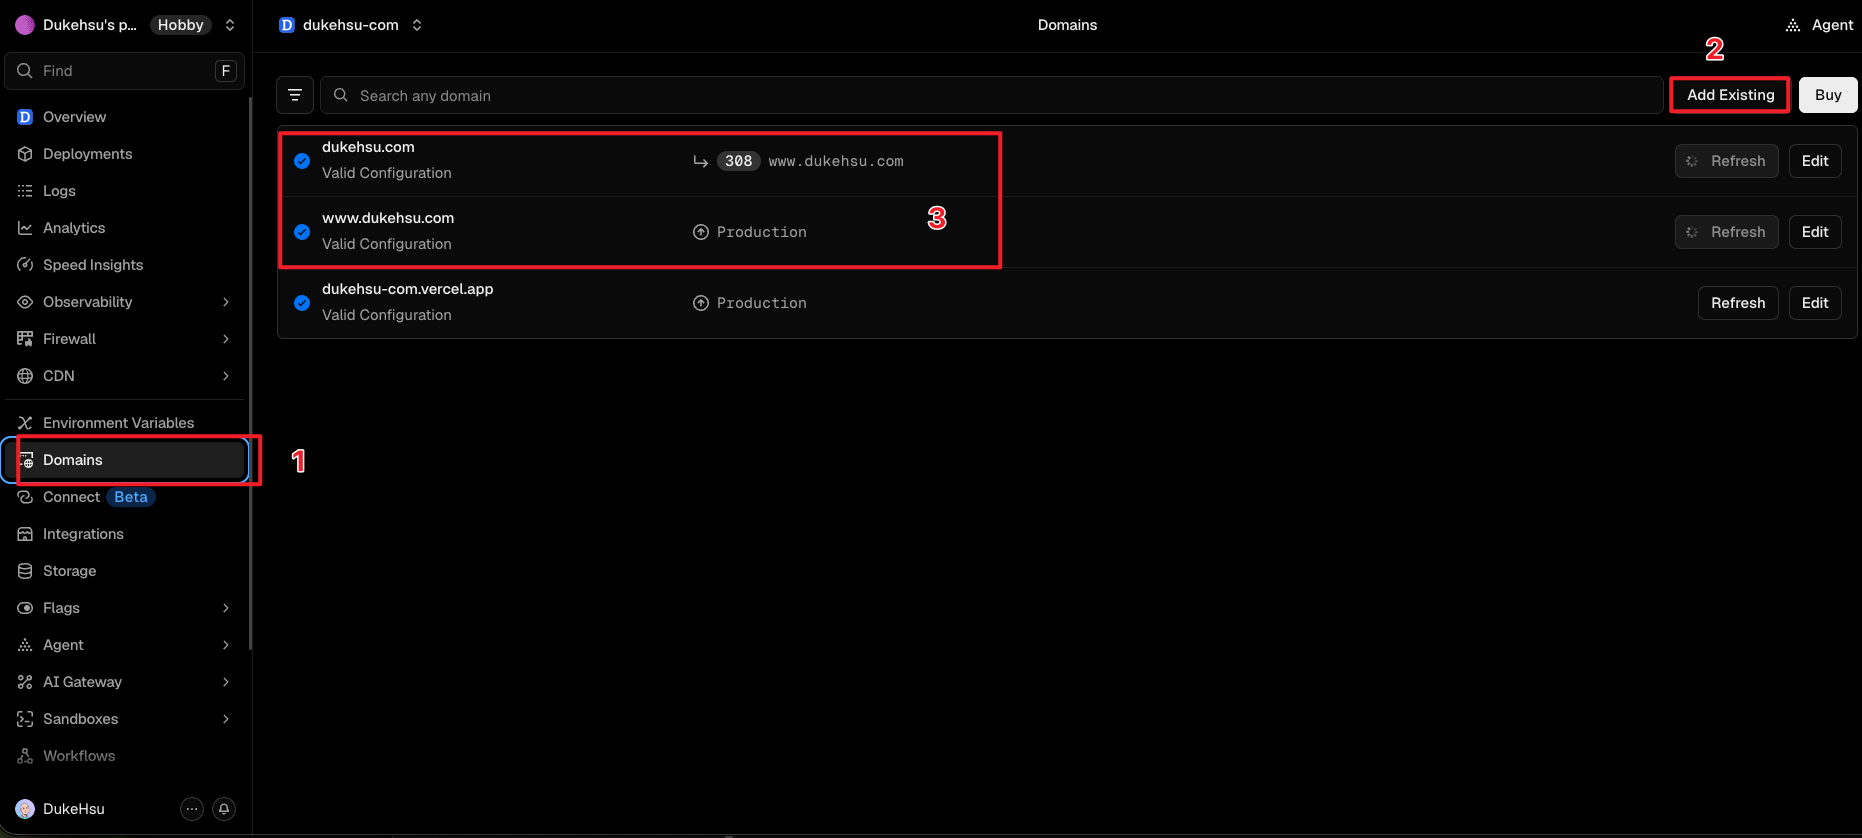
- Select your hugo project in vercel’s project
- In the left function bar of this project you will see ‘Domains’, click on it
- Then there will be a
Add Existingin the upper right corner. Add it according to the prompts, and then go to your domain name provider to specify and change the cname.