文章目錄
- 在本地電腦安裝好Hugo, 選擇主題,建立Hugo 專案
- 從Wordpress後台導出內容,再回到本地電腦轉換成Hugo 的 Markdown 格式
- 將整理好的內容和Hugo部落格push 到Github
- 在Vercel 上連接Github repository , 並設定build 指令和
- 配置專屬網域
1.安裝hugo主題並啟動測試
Binary Install
cd ~
wget https://github.com/gohugoio/hugo/releases/download/v0.164.0/hugo_0.164.0_linux-amd64.tar.gz #download

tar -xzf hugo_0.164.0_linux-amd64.tar.gz #unzip
sudo mv hugo /usr/local/bin/hugo #move to bin
hugo version #check hugo version
New Site and Add Theme
cd ~
hugo new site myblog #new site by hugo
cd myblog
git init # git init
git submodule add --depth=1 https://github.com/adityatelange/hugo-PaperMod.git themes/PaperMod #Add PaperMod theme
現在, 你就可以在 hugo.toml 文件中将主題 PaperMod` 添加進去。
hugo.toml Example:
baseURL = "https://{yourdomian}/"
languageCode = "en-us"
title = "Site title"
theme = "PaperMod" #theme name

[params]
  defaultTheme = "auto"
  ShowReadingTime = true
  ShowShareButtons = false
  ShowPostNavLinks = true
  ShowBreadCrumbs = true

[markup]
  [markup.goldmark]
    [markup.goldmark.renderer]
      unsafe = true
然後就可以執行 hugo server -D 來啟動 hugo 檢查是否可以正常啟動
Tips
#bind only
hugo server -D --bind 0.0.0.0 --port 8080


# bind and baseURL
hugo server -D --bind 0.0.0.0 --port 8080 --baseURL http://123.45.67.89:8080/
2. 使用 wordpress-export-to-markdown導出Wordpress 內容文件並轉換成Markdown格式
Tips
xml格式文件。然後再確認安裝node 和 npm. 因為轉換成markdown ,要用到。匯出xml步驟: WordPress 後台> 工具> 匯出程式
使用 wordpress-export-to-markdown 轉換內容
進入項目根目錄,記下xml 文件的path
#確認npm, node >20.12.2版本
node --version


npx wordpress-export-to-markdown #等待下載套件

#會提示你輸入xml文件的路徑
#剩下的全部默認就可以
#轉換完成會有匯總顯示

ls output #查看輸出內容

cp -r output/posts/* content/posts/ #複製轉換好的內容到posts 目錄

ls content/posts/ #驗證搬移結果

ls content/posts/ | wc -l #查看總數
在這期間你可以
- 調整主題樣式
- 修改
hugo.toml配置
3. 將本地的Hugo push 到Github
需要先在github 創建一個新的repository
在本地的hugo 根目錄創建
.gitignore
public/
resources/
.hugo_build.lock
node_modules/
output/- 加入所有檔案並 commit
git status #查看git 狀態
git add -A
git commit -m "Initial commit: Hugo blog with wordpress migrated content"- 連接遠端repository 並 push
git remote add origin https://github.com/{yourname}/{your_repo}.git
git branch -M main git push -u origin main
Tips
合併
git pull origin main --allow-unrelated-histories --no-rebase #合併
git branch -M main git push -u origin main #再push
然後就可以在你的github 上看到內容了。
4. 在Vercel中新增Project 並設定 build指令
找到頁面上方或側邊欄的 「Import Git Repository」 區塊(通常網址列的正上方或旁邊會有),先確認你的 Vercel 帳號有沒有連接 GitHub
如果還沒連接過,會看到類似 「Continue with GitHub」 或 「Add GitHub Account」 的按鈕,點下去會跳轉到 GitHub 頁面,要求你安裝並授權 Vercel 這個 GitHub App
授權畫面會問你要給 Vercel 存取哪些 repo:
- All repositories(所有 repo)
- Only select repositories(只選特定的)
建議選 Only select repositories,然後勾選 你新建的repo,這樣比較安全,不會把你其他 repo 也一併授權出去
授權完成後,回到 Vercel,這時候應該就能在 Import 列表裡直接看到 你選定的 這個 repo 卡片,點旁邊的 Import 按鈕 就可以了。
Build and Output Settings
Build Command:點右邊開關打開,輸入:
hugo --gc --minifyOutput Directory:點右邊開關打開,輸入:
publicInstall Command:留空、開關關閉即可(Hugo 專案不需要 npm install 這類安裝步驟,除非你有用到 Node 相關的 build 工具,目前沒有)
Environment Variables
先加入之前提過的 Hugo 版本設定:
Key: HUGO_VERSION
Value: 0.164.0
Google Analytics 4 追蹤代碼
新增一個 Environment Variables
Key: HUGO_SERVICES_GOOGLEANALYTICS_ID
Value: G-XXXXXXXXXX
5. 配置專屬網域
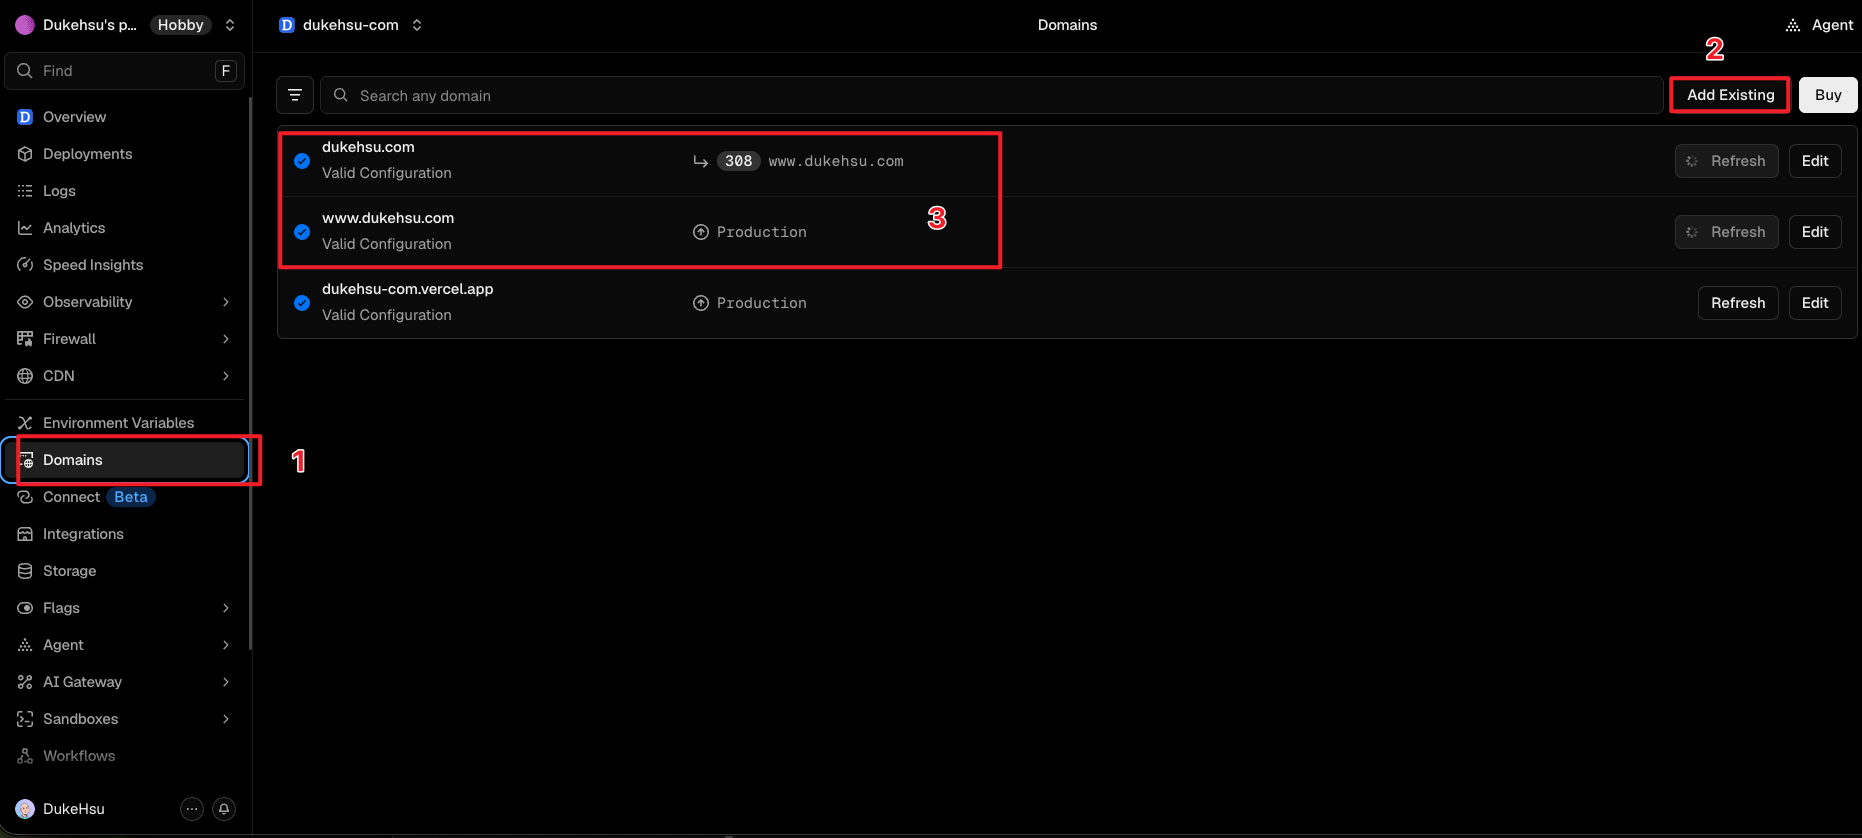
- 在vercel 的project 中選中你的hugo project
- 在這個project 的左側功能欄中你會看到’Domains’ , 點擊它
- 然後右上角會有一個
Add Existing,根據提示添加,然後到你的域名商中指定改一下cname 就可以了